Saturday, May 28, 2011

The Mural

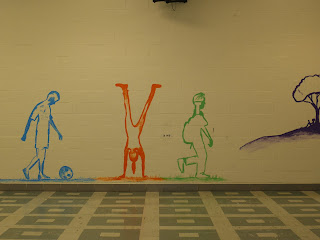
In addition to teaching art, I also sponsor the Leo Club, which is a service organization, and the art club. A few weeks ago with the three other teachers who help with the Leo Club and a group of the middle school kids painted a colorful mural on the multi-purpose room (cafeteria) wall of our school. This is how it went.


The beauty is that it is an ongoing project....now for the next wall, already have words spewing out and images of children romping in my head;-)


Yummy colors make all the difference!
The paint crew
Finishing touches.
The mural to be added onto-later

6th grade loom weaving

I really wanted to get my students weaving. Although I had limited supply of looms I decided to go ahead and have my sixth graders weave. I split my two classes and had the one try the paper plate weaving and the B-day class did the loom weaving with 9x13 inch cardboard looms. We learned vocabulary and used yarn to create the weft or vertical strips through which you actually do the weaving.
Luckily my sister works in a  quilting store so I had a bunch of colorful material strips on hand and decided to use fabric rather than yarn for the weaving to make the process go faster and also to give the weaving some visual interest. The fabric was used for the warp.

Here are some of the results. I let some students add beads in if they wanted to.
The bulletin board

Everyone had different color choices which created nice effects

This student found gold ribbon in a fabric bag and added beads.


Super job by Ezekiel J.


Some students had more difficulty with the actual concept of weaving but the end product looked freeform and beautiful.


Erick went with a Carribbean blue theme.

Ezekiel D. was a natural at this process.

Sunday, May 22, 2011

paper plate weaving

My sixth graders did two types of weavings. 
I first saw this weaving technique on themanualescanigo.blogspot.com/. I love, love, love this blog.
One class tried the paper plate weaving. They turned out pretty well. We had a bit of trouble trying to regulate the distance of the cuts for stringing the weft in the paper plates. The theory is that the number of strings in the plate should be uneven so that when you go around you naturally end up weaving in an over and under pattern with no issue. If your weft strings are an even number, you will have to remember to alternate or skip going over  (or under) a weft every time you complete a circle or the weaving will not alternate "over and under" and it will start to bunch up. This can be confusing for the students.

The students were instructed to draw a pattern with colored markers to coordinate and to try to cut out a little pattern from the edges to make the design more interesting.
Here are the some of the paper plate weavings.




Under the Sea

My third graders had a great time with this project. We finished the entire piece in forty five minutes and even had time to create a graph on the board to tally which undersea creatures were drawn on the most papers.

We started out by imagining we were snorkeling in a great barrier reef. The students raised their hands and told me what they imagined they might see under the water.  I drew what they told me on my paper on the board, then let them go to town drawing their own undersea world, including any imaginary beings, like mermaids and underwater castles. They drew in black crayon on 12 x 18 paper.


Meanwhile I put out watercolor palettes, water cups and paintbrushes. Here are some of their finished pieces.  Magnificent!
Covering the paper with color completely changes the look.


A giant squid and underwater lightning!


I love the drips.


Thus student spent alot of time on his Titanic ship. I had to speed him along.